

Description

Photoshop started the digital image manipulation revolution more than 30 years ago, and Adobe’s groundbreaking application continues to be the best photo editing software money can buy (or rent, to be more precise). If you need layered image editing, typography, 3D modeling, drawing, and a multitude of effects, you need Photoshop. Designers and photographers alike find the most—and the most-advanced—tools available for their crafts in this application. Mind-blowing AI-powered neural filters, sky replacement, live shapes, more control over cloud-stored files, and pattern preview all appeared in the major update released at the company’s Max conference. New capabilities include a Super Resolution raw enlargement tool, support for Apple Silicon-based Macs, and 70 new Camera Raw presets. Photoshop remains PCMag’s undisputed top choice for professional photo editing software.
Table of Contents
The Photoshop Interface
Adobe keeps making Photoshop’s interface more customizable and helpful. You can choose from among several targeted workspace layouts, including 3D, Graphic and Web, Motion, Painting, and Photography, or you can create your own custom layout of panels and windows. You can even rearrange the program’s toolbar button rail to taste.
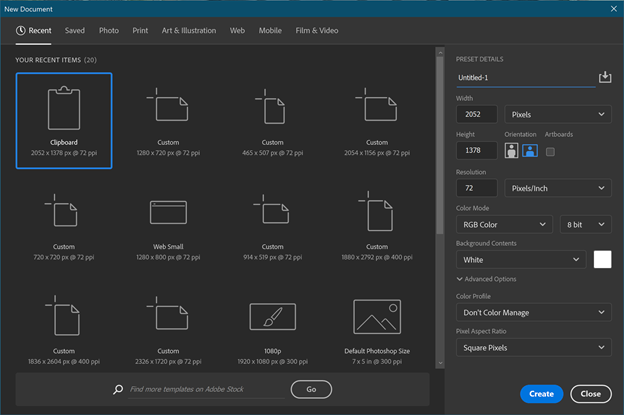
Choosing New Document presents a dialog offering templates such as Textured Geometric Masks, Instant Film Mockups, and Photo Collage Layouts. Category filters across the top let you restrict the proposed templates to Photo, Print, Art & Illustration, Web, Mobile, and Film & Video. If you’ve copied an image onto the clipboard, the software gives you an option to open a new image with its exact dimensions.
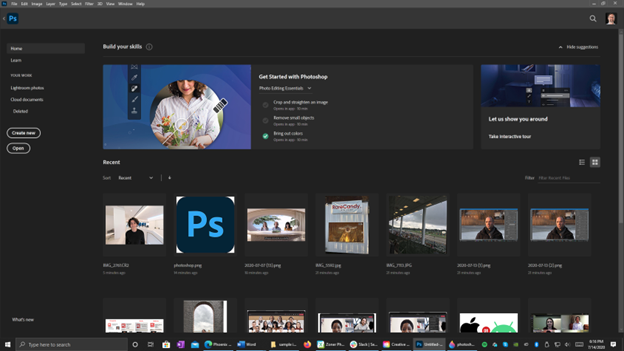
You can pick from thumbnails of your recent files, and access presets and libraries from the start page. The page shows personalized tutorial content at the bottom. Those who’d rather stick with the legacy starting experience can switch back to it, but I find that the start page makes it much easier to get to things I’m interested in, such as recent projects.
The ever-present search magnifying glass icon at the top right lets you find program functions, your own images, tutorials, or Adobe Stock images. For version 22, the resulting dialog becomes a detached Discover window, but it still presents command shortcuts and help. You can also click its Home icon to get to an index of tutorials, What’s New items, and the Help user guide. I think a search function in a complex desktop application is a great idea, and some big-league software developers agree. Microsoft helpfully introduced it to Office 2016, for example. For context-sensitive help, the lightbulb icon is always at the ready for quick demos of how to perform edits.
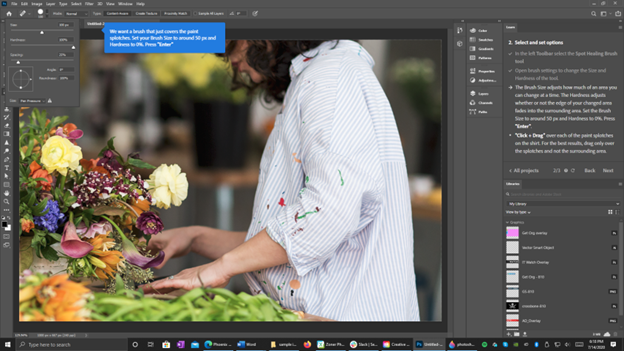
The interface also adapts to the purpose at hand. A case in point is the Select and Mask workspace, which is an available option whenever you have a selection tool active. This shows only the tools useful during selection, such as Refine Edge, Lasso, Brush, Hand, and Zoom, along with the relevant Properties panel. The interface’s color themes offer a pleasing, context-sensitive consistency, too. If you set the window borders to be light gray, all dialogs will likewise be gray.
Selection Tools
Selecting objects and people in photos is one of the top activities in the application—and one of the top pain points. In the last few versions, Adobe has added Object Select, Subject Select, and the Select and Mask workspace just mentioned, along with its Refine Edge option.
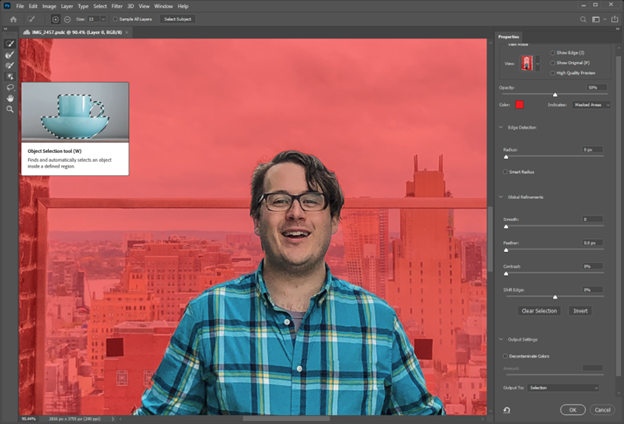
Select Subject uses AI (called Sensei by Adobe) to automatically determine and select the main object in an image. Object Select lives in the same toolbar button as the Quick Selection and Magic Wand tools. When either of these is active, a Select Subject button appears in the options bar across the top of the program windows. In testing, pressing this did a remarkable job of selecting people when the background was relatively uniform. More complex backgrounds left some mis-selected areas.
The June 2020 update of Photoshop improved the Select Subject tool, addressing one of the most common selection tasks and pain points. Selecting people’s hair has long plagued photo editors—even with tools like Refine Edge. Adobe claims to have finally solved this problem for once and all with the update.
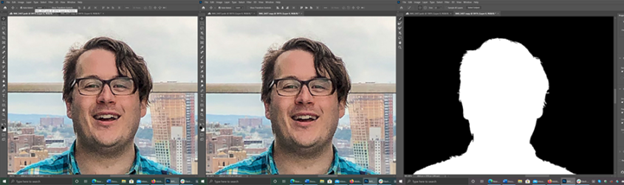
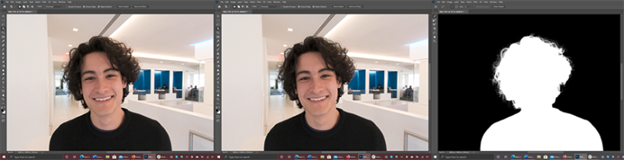
In my testing, the tool worked impressively, but we haven’t yet reached the holy grail of hair selection, one-and-done hair selection. There was still plenty that remained unselected in my test shot, and it was hair fibers on a plain background that’s clearly hair to the human eye. I took screenshots of the tool’s handiwork, showing the original, the dotted-line selection, and the black-and-while mask view, which shows just the selected matter as white. I had similar not-quite-perfect result with both a low-res shot:
and a higher-resolution shot:
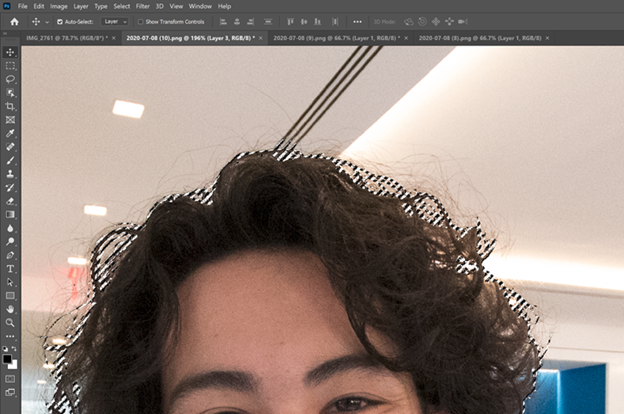
Here’s a detail from that last one, showing the unselected fine hairs at top and top right:
And here’s a use of the selection with a gradient background layer:
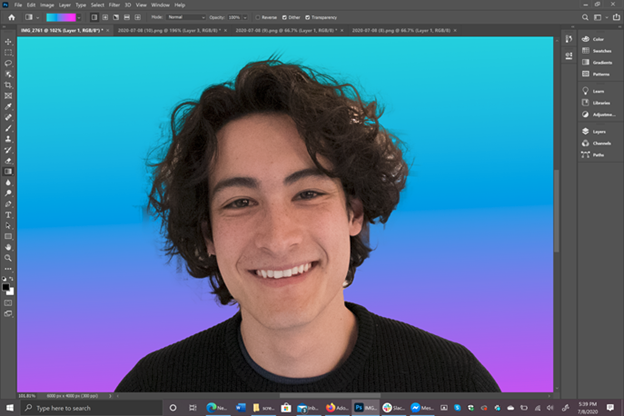
You can see white background areas that were missed in the selection, and some hair strands look smudged. Still, while it’s not yet perfect, it is getting better with every iteration, and the current one makes for a good first pass. It’s the most automatic portrait selection tool, but Capture One’s Refine Mask tool does an excellent job as well (below), even getting some hair strands missed by Photoshop. It originally selected some of the background, which I fixed with the eraser.

Neural Filters
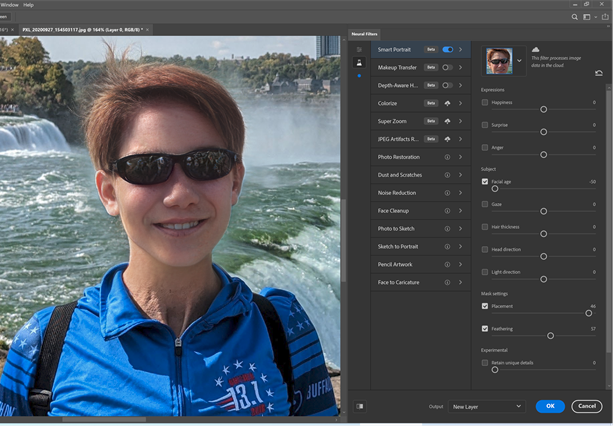
The most exciting Photoshop features to come out of the company’s MAX 2020 conference are neural filters, which magically let you change a portrait subject’s mood, age, and gaze. Neural here is short for neural network—a subset of AI machine learning. The tools actually take advantage of Generative Adversarial Networks (GANs), which in essence, use a technique of trying to trick the AI algorithm with incorrect (or adversarial) data. Most of the new Adobe effects do their processing in the cloud, so you may need to wait a bit for them to appear. The most interesting such filters are labeled as beta and included under an Erlenmeyer flask icon group; only Skin Smoothing and Style Transfer are not considered betas.
Several of the tools with entries in the panel are not even available (those marked with an i), but you can register your desire for Adobe to produce them. Some of the filters require an extra download. Other worthy options are Colorize, Super Zoom, and JPEG artifacts removal. Not yet available are the intriguing Photo Restoration, Dust and Scratches, and Face-to-Caricature options. The Super Zoom effect didn’t do much aside from applying a blurry noise reduction.
The face tools are possibly more fun than practical. When I ramped up Happiness slider on most pictures, the result was more like a forced smile than a natural one, though it can be effective if you don’t turn it all the way up. There are also sliders for Anger, and Surprise, which were surprisingly effective. The algorithm also failed to de-age the neck on some subjects. An interesting option is Retain Unique Details; if you uncheck this, your subject approaches a Barbie-doll appearance. One slider, Placement, can nudge the face selection box right or left, though it didn’t do much in my test shots.
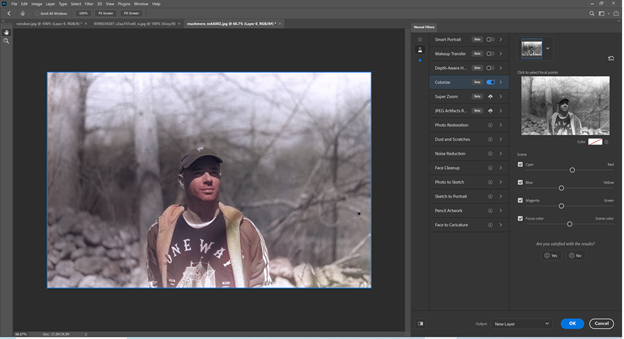
The Colorize tool, though impressive, failed to bring alive the hands as well as the head in an old photograph. Still, it’s clearly labeled as beta, so you can’t take points off for that; I actually had better luck with Photoshop Elements’ Colorize tool. On a couple street- and beach-scene test photos it did nothing, but it convincingly colorized a snowy reindeer scene. The neural tools do have a Before-and-After button, but I wish it had a side-by-side view.
The Light Direction tool, when used judiciously, can work to good effect. The Gaze slider moves the eyes subtly, but the head direction tool wasn’t convincing in my test photos.
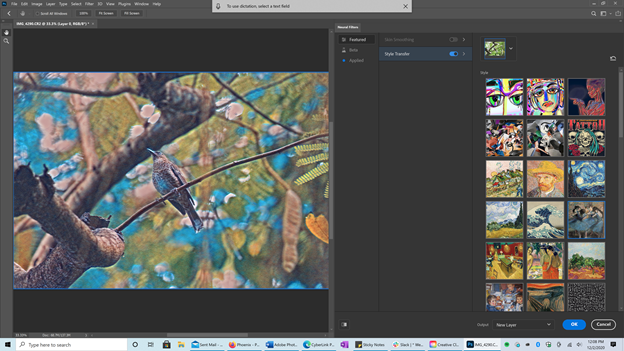
The final neural filter I’ll discuss is something that’s been in other photo software for a few years, notably in Cyberlink PhotoDirector. It’s the Style Transfer effect, which makes your photo look like the work of an artist such as Picasso or van Gogh. It’s a 176MB download at the time of testing. There’s a good selection of looks, with over 30 to choose from already. You can not only choose the strength of the effect, but also preserve color, focus on the subject, change brush size, and blur the background. It’s a good implementation of the effect type.
Tools for Photographers
Though it’s now packed with drawing and font tools, Photoshop got its start as a photo editing and printing application, and it remains the most powerful photo editing software. Along with its completely photography-focused sibling, Lightroom, Photoshop offers the most support for raw camera files, and the most in correction and effects. From removing or adding objects with content-aware tools to lens-profile-based geometry correction to histogram adjustments to stained-glass effect filters, Photoshop has it all. It’s impossible to cover every feature here, but I’ll take a closer look at a couple of the standout tools.

Sky Replacement. Sky Replacement. This is a new tool for the October 2020 version. Photoshop had been trailing software such as Skylum Luminar. Replacing a drab sky with a beautiful one used to be a many-step process involving manual masking and layers. The new tool is instant—and awesome. You get many choices, ranging from pleasant to dazzling, and you can adjust the position, edge, brightness, and temperature of your chosen sky replacement.
Unlike some tools, which simply try to detect a horizon, Photoshop’s can handle images with foreground objects that block the sky, like the obelisk in the image above. You can move the sky around to get the best placement and even adjust the lighting and color of the foreground to better match the new sky. In the example, you can see how the pavement reflection changes to match the sky color.
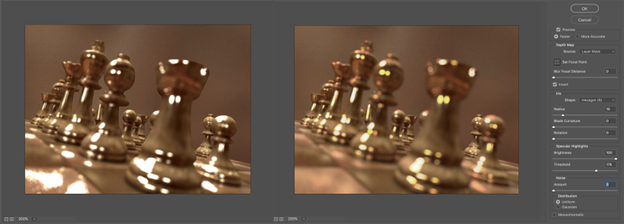
Lens Blur.Lens Blur. The AI-enhanced Lens Blur tool creates a more color-aware effect than its non-AI predecessor. The old lens blur is in the left above, and the newer is at the right. The newer tool also give you control over bokeh shapes, which would be created by the blades of a camera iris in real lens blur. Photoshop’s simulated effects include a choice of polygons from triangles to octagons, and you can also adjust the blade curvature and rotation.
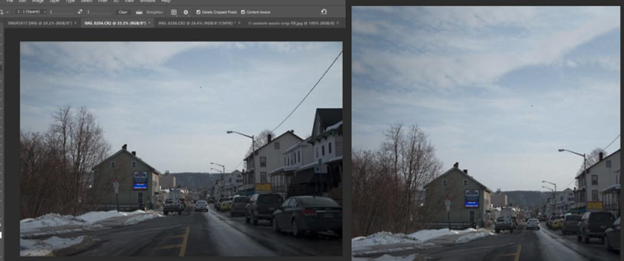
Content-Aware Crop. Content-Aware Crop. A few years ago, an app called Anticrop (since renamed to Recrop) gained momentary celebrity in the tech world. Why? As its name suggests, it lets change you change the aspect ratio of an image by adding to the sides instead of simply cutting them off. The Photoshop tool works similarly. Just check the Content-Aware box while using the crop tool, and the app fills in anything in the crop selection that falls outside your image’s boundaries. Content-Aware Crop resembles the Content-Aware Fill tool. Like that tool, Content-Aware crop only works well with patterned image content, such as a forest, pavement, sea, or sky. It’s particularly convincing with skies. Note in the image below all the extra clouds generated in the sky on the right to create a more spacious square composition.
Content-Aware Fill has also been updated, with an interface that shows you what source content it’s using to replace the object you want to remove. You can edit the source area, but the program does a remarkable job with no help—it’s even improved over last year’s version, now identifying objects that shouldn’t be part of the fill pattern.

Face-Aware Liquefy. Face-Aware Liquefy. Face detection has reached an increasingly high level of accuracy in recent years, to the point of recognizing individual facial features, as well as whole faces. Face-Aware Liquify resembles a feature we first saw demonstrated by Adobe at Apple’s iPad Pro launch event in the app called Adobe Fix. Face-Aware Liquefy tool lets you convincingly transform facial expressions, turning, for example, an RBF into a smile.
This brilliant tool finds facial features like eyes and mouths and gives you the ability to manipulate them with sliders for resizing the eyes, nose, face width, and jawline. You can even edit the eyes independently with Face-Aware Liquefy. A chain icon lets you either lock together editing of both a subject’s eyes or edit them separately.
You can apply some very flattering changes, or some ridiculously unflattering ones, as you can see in my test images. For me, the coolest part of this feature is that the resulting image still looks human. It’s not like simply smearing a portrait with the old-fashioned, face-unaware Liquify tool. Note in particular the added smile at lower left.
Camera-Shake Reduction. Camera-Shake Reduction. One of the hottest features of Photoshop is camera-shake reduction. The tool analyzes the photo to find the path of shake motion, and then aligns the shifted pixels. It sounds simple, but it’s harder to get right than it may seem. This is because the path won’t be the same everywhere in the photo unless you shook it exactly along a single plane, which is highly unlikely. You can use the tool’s best guess or select a region (or regions) in which you want the blur trace to be estimated.
You can also adjust Blur Trace Bounds, Smoothing, and Artifact Suppression—the last two let me create a less sharpened-looking result. I’d love to see a simple effect-strength adjustment like you get with Smart Sharpen (which, by the way, has a Reduce Noise slider). Shake Reduction is not a panacea, but it’s definitely a finer effect than even the Smart Sharpen tool. If the subject is simply out of focus, it won’t help you; a simply blurry subject won’t be fixed.
Camera Raw Features
The Adobe Camera Raw module that the program uses with, you guessed it, raw camera files like Canon’s CR2 and Nikon’s NEF, seems to become more of a full photo editing tool on its own with every Photoshop update. For example, it lets you make local hue adjustments, rather than having to change the hue values for the whole image. The tool lets you have more than one adjustment panel open, and you can switch between vertical and horizontal filmstrip thumbnail views. You can also create presets based on images’ ISO settings and do panorama merges from a right-click.
Photoshop offers several advanced capabilities in its Camera Raw module, including a geometry correction tool called Upright. This lets you fix parallel vertical and horizontal lines. Its Auto setting attempts to fix perspective errors, but you can choose to align only verticals or only horizontals, or mess with the perspective to taste with transforming sliders for pincushion and barrel distortion, vertical, horizontal, and aspect ratio.
As mentioned, you can use Camera Raw as a filter, applying all its manifold photo adjustments—color temperature, exposure, geometry, all of it—to any image layer, not just to raw camera files. You can apply Camera Raw adjustments to video, too, and use a non-circular healing brush. As in Lightroom, you also get a radial filter that lets you apply the adjustments to an oval shape, such as a person’s head—very useful for highlighting that bit of anatomy.
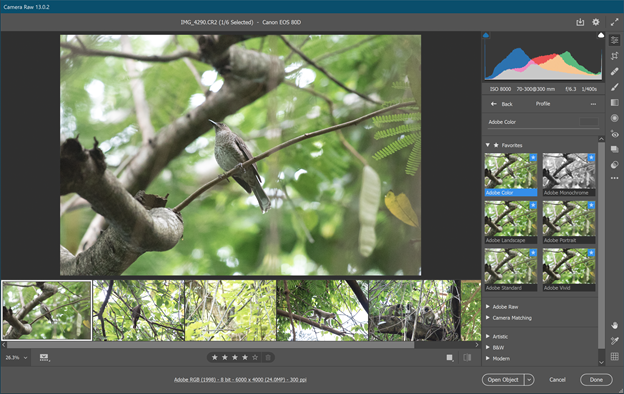
Camera Raw Profiles give you options for how Photoshop converts raw files into viewable images. The default is Adobe Color, which produces a more vivid image than the old Adobe Standard profile. You also get Landscape, Portrait, Monochrome, and Vivid Profiles, along with a selection of retro and artistic Profiles that are essentially Instagram-style effect filters. The same Profiles feature appears in Lightroom. Read my review of that application for a more in-depth look at Profiles.
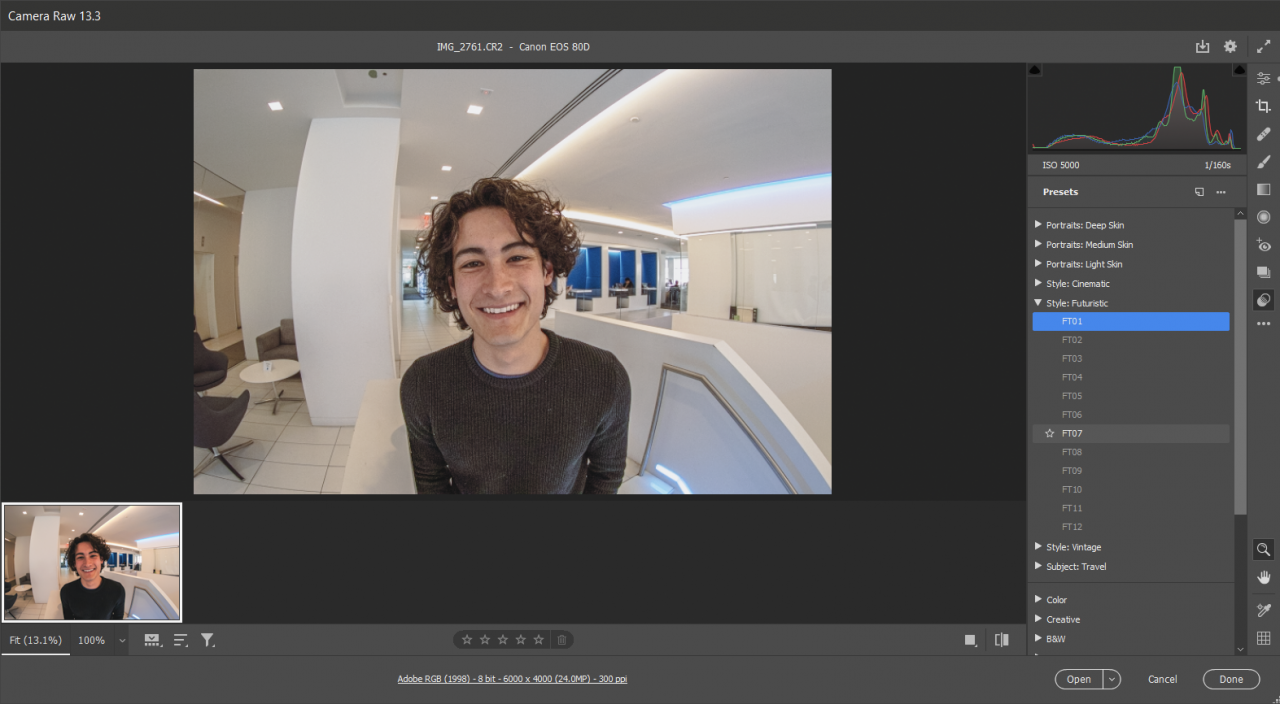
The module also now includes over 70 presets developed by pro photographers, in categories including portrait, travel, cinematic, future and vintage. Unfortunately, a lot of the presets use nondescriptive names like FT1, FT2, FT3, and so on. They’re also a bit drab overall, with few—even in the Creative category—resulting in particularly striking effects. The Travel presets seemed the most interesting.
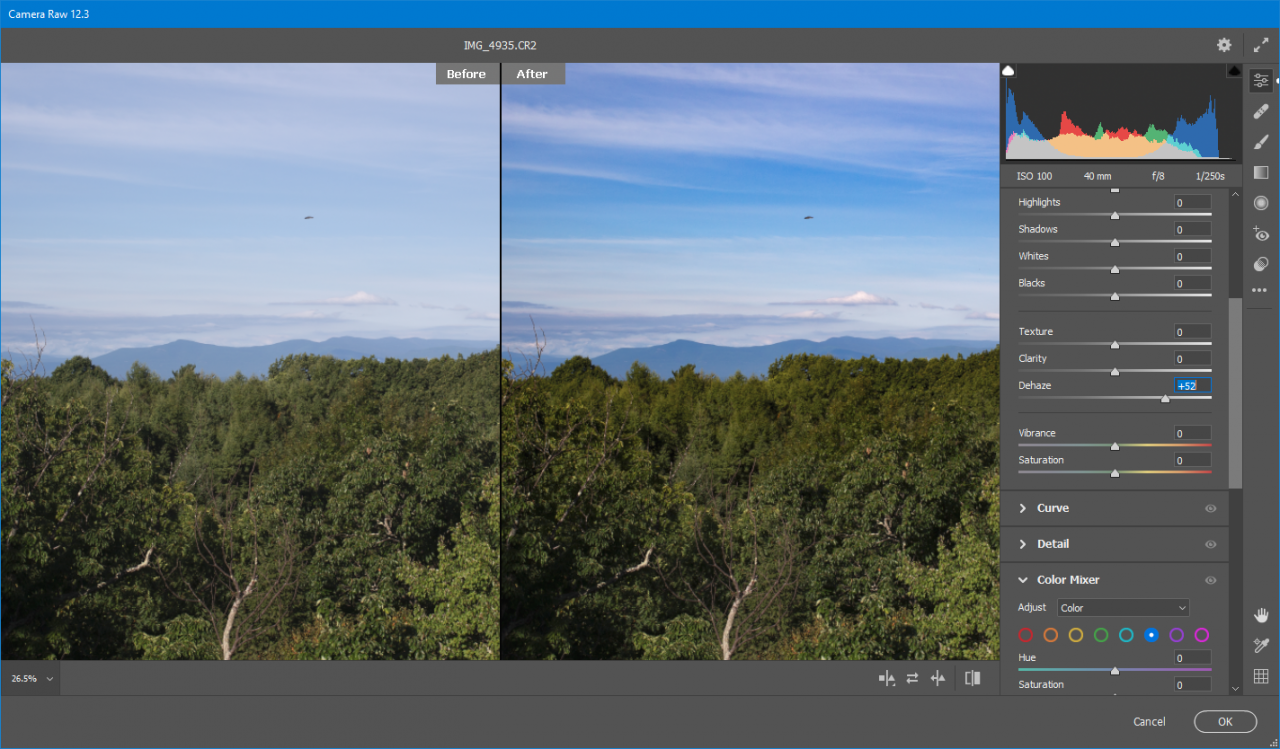
Dehaze is a Camera Raw feature also offered by Lightroom. Open any photo, even if it’s not in raw file format (I tried it on a mobile-phone JPG image), and this slider in the FX tool set does a pretty impressive job of removing—or adding—haze. Above, you can see the before and after (left to right) on a sample.
Super Resolution
The March 2021 release added an intriguing feature called Super Resolution. It uses machine-learning AI to effectively double the resolution of your image, which is a great help if you need to print photos that you’ve cropped significantly. The update also added support for Apple’s ProRaw format and gives you more control over the interface, letting you re-order edit panels and sort the filmstrip based on date, rating, and more.
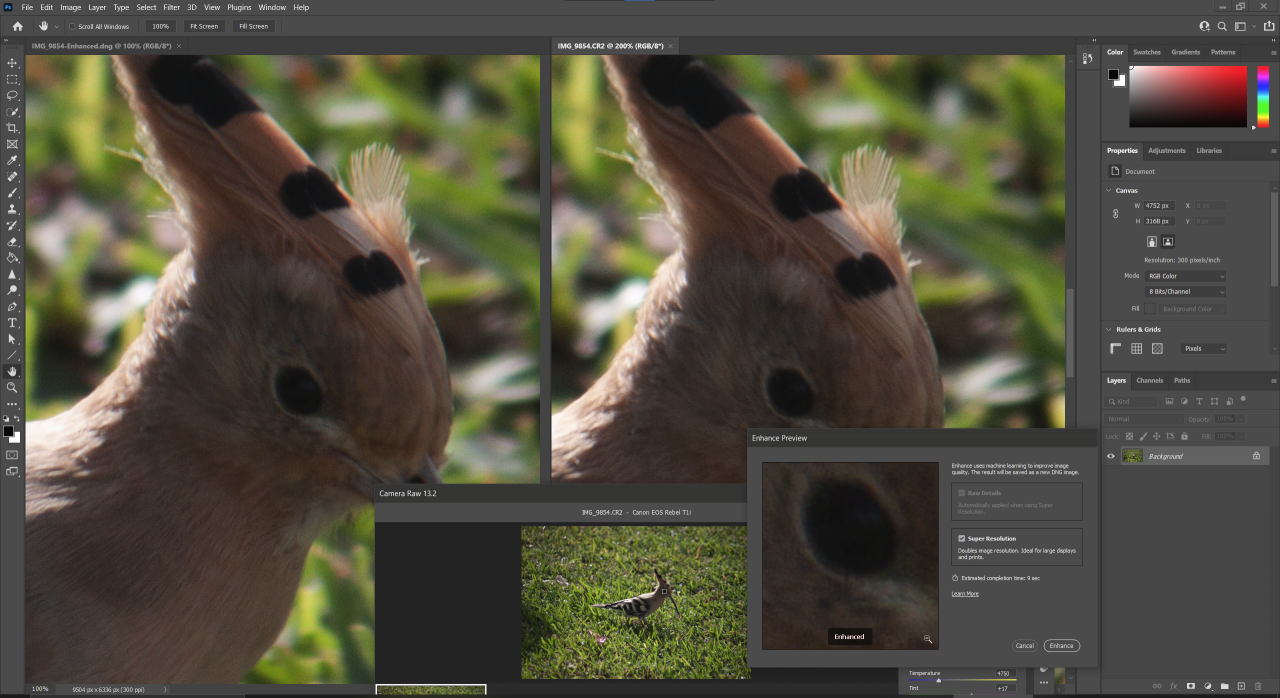 Super Resolution (left) vs. standard raw conversion (right).
The Super Resolution feature is related to the Enhance Details that landed in Photoshop and Lightroom in 2019. In fact, you only see the Super Resolution as a check box option inside the Enhance dialog, which you won’t see unless you right click on the image (Ctrl-Click on macOS). In my test shot above, I saw some smoothing, with the result that the enhanced image actually seemed to lose detail, though for printing, smoothing pixelated edges as in the Hoopoe’s bill below, is a win. Note that it’s not an instant effect: Creating the resulting DNG file tool about 7 seconds on my test PC.

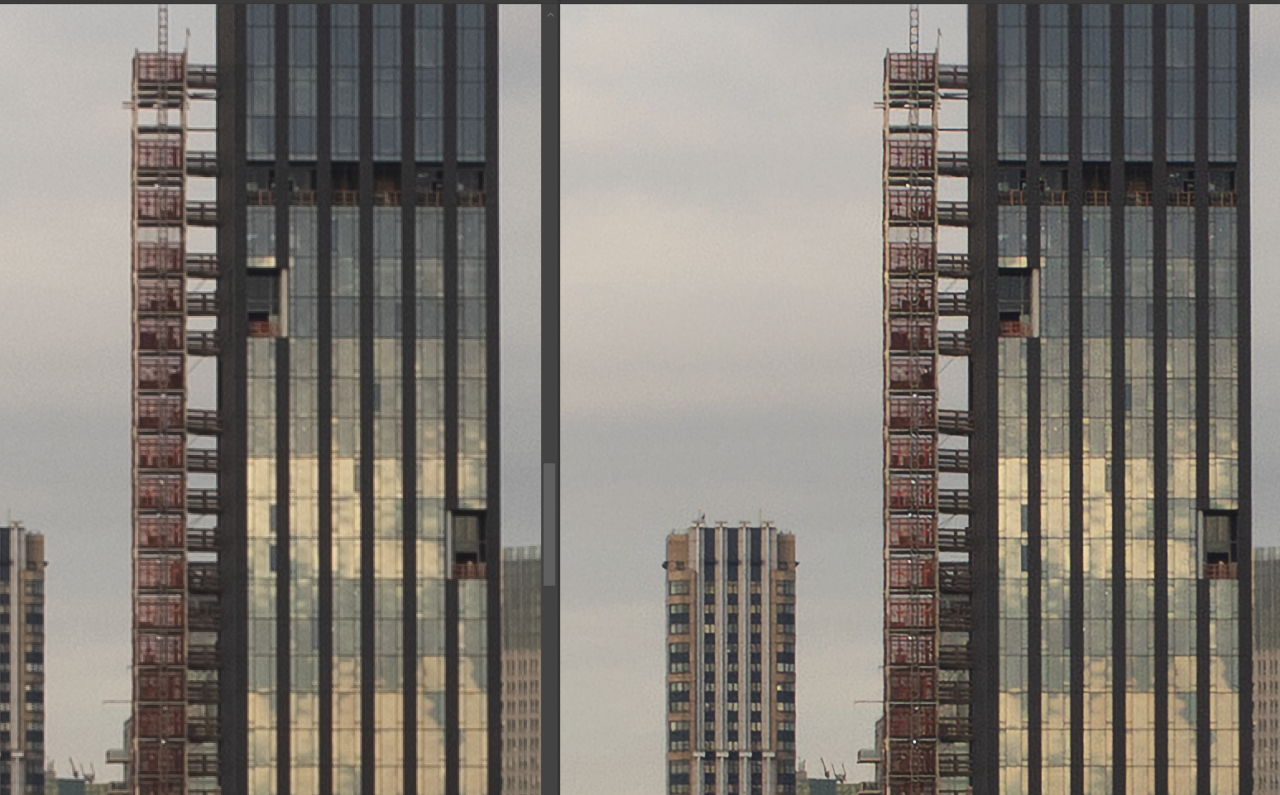
It worked even better on the geometric patterns of an architectural shot. See below—The enhanced version is on the right).
Mobile Design and Libraries
Photoshop has made great strides in the area of mobile design. Not only can you use views and tools intended to facilitate mobile and web design, such as Artboards and Design Space, but you can also install the Adobe Preview mobile app and see how your project looks on it. When I installed the app on my iPhone, I initially got a connection error. I was trying to connect by USB rather than Wi-Fi, though the Adobe documentation says both methods should work.
The Design Space workspace presents a smaller, simpler tool set, and it is geared to working with HTML5, CSS, and JavaScript. A tutorial panel helps you get started with this interface option. In Design Space, you can search and sample anything you work with, including colors, effects, fonts, layers, and your Library. What you don’t get are the standard Photoshop photo adjustments and effects, but you can easily switch back to the standard Photoshop interface from Design Space.
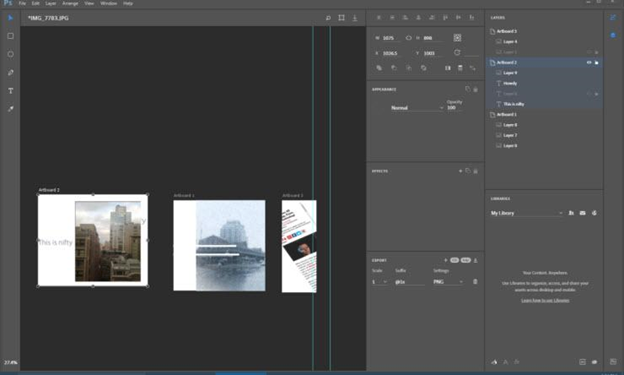
Artboards let you create Photoshop documents with multiple views for different device screens. An Artboard can also be thought of as a level above layers. In fact, they’re accessible from the Layers panel. It sounds a little dry, but after playing with Artboards for a while, I find it to be a useful capability.
Design Space uses Artboards by default. It also includes templates for current iPhones, iPads, Surface Pros, and other mobile-device screens. While I appreciate the thought behind these tools, I still expect it’s going to be a hard sell for designers who are used to the full Photoshop interface. It does offer a streamlined way to work with multilevel layer content, though. It also lets you manipulate multiple objects at once, or easily swap their locations.
For a few years, Adobe has offered a way to sync content across multiple installations of the Creative Cloud apps, but the current Libraries feature takes this a step farther. Libraries sync not only documents, but also brushes, font styles, and color themes. They can be created and accessed not only on the full Photoshop application, but also in mobile apps such as Capture, Hue, Photoshop Fix, Photoshop Mix, Photoshop Sketch, and Comp. The Adobe mobile apps support Libraries for acquiring, creating, or editing content. They’re all free downloads, but most require a Creative Cloud account for full functionality.
Related to Libraries are Cloud Documents. Saving your project as a Cloud Document enables you to work on it in the iPad version of Photoshop as well as on other desktops. Cloud Documents are saved instantly and, as of the June 2021 update, allow collaboration among multiple creators, with an Invite to Edit option. You can also open documents in Adobe Fresco. You can access previous versions of cloud documents in a Version History panel; you can even name versions. You can also now make cloud documents available for offline editing.
One odd development for saving files has caused something of a tempest in a teacup recently: Adobe added a Save a Copy menu choice, since the macOS API the program used for standard Save As functionality was discontinued by Apple in Big Sur. The new Save a Copy choice is now in Windows as well, for consistency. Save a Copy offers more format choices, while Save As only lets you save in PSD, PDF, or TIFF.
Unfortunately, Adobe doesn’t have a spotless record when it comes to storing your media in the cloud. Some Lightroom users were taken aback to find that their unsynced photos had been lostduring an app update. Use Adobe’s cloud for convenience, but it’s still a good idea to back your work up.
Adobe XD (Experience Design) lets designers prototype and design interfaces for websites and mobile apps. It uses Artboards for the various app and site functions, and its work can also be shared via Libraries.
Photoshop Libraries support Adobe Stock templates (see below) and can share read-only access to a public Library and to follow others’ Libraries. You can share a Library with anyone who has a Creative account and set permissions for collaborators, limiting them to read-only rights or granting them full edit privileges.
Adobe Stock
Adobe Stock, which emerged from Adobe’s 2015 acquisition of Fotolia, is a repository of over 40 million images, vectors, illustrations, and video clips. Non-Creative Cloud members can still buy assets from Stock. Creators can also sell their assets and get a 33 percent cut of all sales. That’s not bad, considering that the industry standard is 25 percent.
You can work within any Adobe desktop apps with Adobe Library support, including Photoshop, InDesign, Illustrator, Premiere Pro, and After Effects. The Search Adobe Stock menu choice opens the website, on which you can search for content and either download or sync it to your Creative Cloud Library. But you can also search Stock right in the Library panel and insert it into your image, where it will be watermarked until you license it. After you license it, it retains any edits you make.
Font Tricks
Photoshop keeps getting better at fonts. With the June 2020 update, your document’s fonts are automatically downloaded, activated, and synced to your Library. You can also filter searches for fonts with attributes like serif, script, and blackletter, and you can even tell the program to show you fonts similar to one you’ve selected.
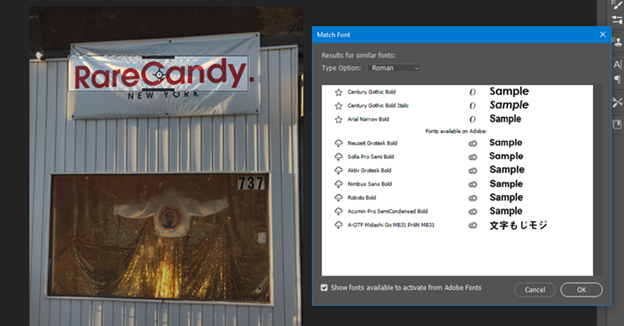
The Type>Match Font… tool can actually identify fonts in images and find the closest match on your system or in Adobe’s massive font collection. Its intelligent imaging analysis is improved in the June 2020 update with more fonts, vertical text, and multiple-line detection. I had better results in my testing this time around.
You can also designate fonts as favorites, which is particularly handy. Another nifty touch is the ability to hover over a font choice to see it previewed in your document. As you hover the mouse cursor over typefaces in the search panel, your selected text instantly switches to that typeface. The font size dropdown menu offers a 16-point option, a size commonly used for web content. Web designers will also rejoice now that Photoshop supports SVG OpenType fonts for those wildly popular responsive designs, as well as emoji fonts. You can search fonts.adobe.com for typefaces, and everything is licensed thanks to your Creative Cloud subscription.

Font fanciers who want to go even deeper than just standard typeface sets will love the Glyphs panel. This lets you substitute alternate characters, and even shows you those alternates when you select a character in a Type layer. The tool didn’t always work reliably for me, though, sometimes proposing a previous letter when I selected a new one.
Photoshop also supports Variable Fonts. This is an OpenType font format that lets you play with custom attributes like weight, width, slant, and optical size using slider controls.
Tools for Artists and Designers
With higher-resolution displays becoming more common, your old images sometimes may not be good enough anymore. Photoshop’s upsampling algorithm could be a lifesaver. The upscaler shows up when you resize an image, in the form of the Preserve Details resample setting. This also offers a Reduce Noise option, since the process may introduce noise. It’s definitely clearer than the old bicubic algorithm.
Smart Objects make for nondestructive, reusable raster and vector images that update throughout your project. You can save formatting of type as styles that can be easily applied to other text later. You can also view type in a way that previews the antialiasing used in web browsers. For web designers, Photoshop can generate CSS code that produces the exact look designed in the software. Going in the other direction, the software can also import color from a website’s HTML or CSS code.
Converting Smart Objects back to their components for editing is now a simple matter of using the Convert to Layers menu option. The default swatches, gradients, patterns, shapes, and styles have all been updated with more appealing options. Below you can see the gradient panel on the right, for example.

Photoshop offers a vast array of brushes and pencils—over 1,200 of them. These offer stroke smoothing options, and you can organize brush presets in folders. A recent capability is the Symmetry option. This works with Paint Brush, Mixer Brush, Pencil, or Eraser tools. To use it, you click the butterfly icon in the Options bar, and then choose the kind of symmetry you want: Vertical, Horizontal, Dual Axis, Diagonal, Wavy, Circle, Spiral, Parallel Lines, Radial, or Mandala.
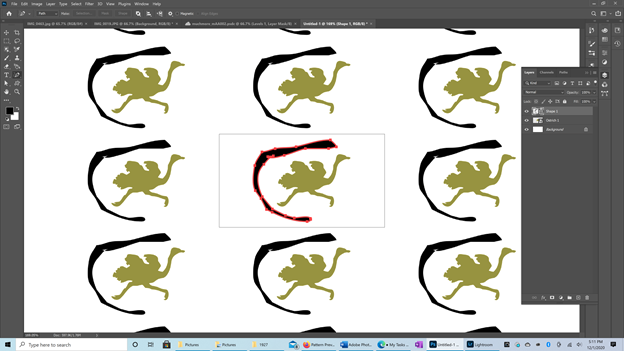
A Pattern Preview feature simply repeats whatever’s in your image as a grid—outside of the actual image boundary. You can then save the result as a reusable pattern. (As you can see, I’m no artist.) This seems like a great tool for gift-wrap designers!
Of course you can simply use the Shape and Line tools from the left-hand toolbar. In the June 2021 update Adobe lets you draw raster lines as pixels. Prior to this, you could only draw vector lines, which makes more sense—unless you’re going for a pixel-art effect.
Behance
Behance is a social network for creative professionals, offering online portfolios and connections. It’s built into all the Creative Cloud applications, letting users post projects for feedback from colleagues and clients. Users can post their files directly from Photoshop via a one-click share button. From Behance they can share and discuss the work and even connect with potential and existing clients and freelancers.
Behance is a great resource for burnishing your Photoshop skills, too: It offers a Daily Challenge (often hosted by the wonderful Adobe Principal Worldwide Evangelist Paul Trani) in which you can see an expert working the program’s magic and interact with the presenter via a chat panel.
Behance’s ProSites are customizable online portfolios, which Creative Cloud subscribers can use with their own URLs. Behance’s presentation is elegant and clean, and incorporates all the essential social features du jour. I especially like that it offers statistics of your page activity. You can also export photos in Zoomify format—a powerful viewer that lets viewers zoom deep into large images. I’d like to see more sharing options, however, such as built-in email and Flickr sharing. Of course, you can do all this from Photoshop’s ancillary Bridge image organizer app.
3D Tools
You no longer need to drop a cool grand to get Photoshop’s 3D image editing capabilities in an Extended Edition, as they come with all Creative Cloud or Photography subscription plans. Adobe has also improved Photoshop’s 3D tools, with faster performance and more realistic shadow rendering. Thankfully, Adobe offers downloadable sample 3D documents to get you started.
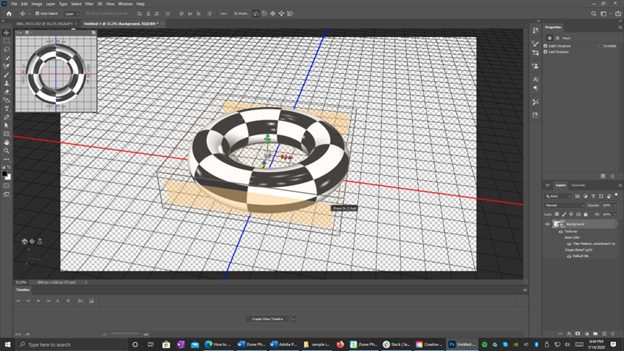
Working in the program’s 3D mode is not for the faint of heart: It’s practically rocket science, and indeed, you could design an actual rocket with it! The 3D Scene panel eases using it somewhat, though, as it consolidates many typical 3D design functions. You can create instances and duplicate 3D objects, which reflect any edits that you perform on the mother object. You can even take a panorama photo and convert it into a 360-degree movie, or pin it to a shape like a sphere, cone, or doughnut.
3D printing still has its enthusiasts, and Photoshop’s support for the technology continues to improve. Photoshop can produce support beams and repair surfaces that wouldn’t print correctly without them. Photoshop even shows color-coded 3D print previews and can export 3D models as PDF or SVX files, control bump-map depth, and automatically simplify 3D meshes. It also supports 3D Manufacturing Format (3MF) files.
Video Editing
You can apply all of Photoshop’s still-image adjustments to video clips—including exposure, cropping, and filters. Photoshop is even capable of multitrack and keyframing, using the same fast rendering engine that powers Adobe’s Premiere Pro video editor. Only a few transition options are available, however, all of them variants of fades. Each video track you add becomes a Photoshop layer that can be individually adjusted.
You also get all the standard digital video editing tools, letting you join, split, and trim clips. Audio tools are minimal, but you can set an audio track’s volume percent, fade it in, fade it out, or mute it. Movie files are saved as PSDs, but by choosing File/Export/Render Video you can create a video file with H.264, QuickTime, or DPX encoding. You also get a decent choice of resolutions targeting both big screens and mobile devices, including 720p, 1080p, and 4K options.
Export and Share
Photoshop’s Export options are richer than ever, and the performance is better, too. It now supports the operating system’s share feature. This comes in the form of an up-arrow icon at the top right, which opens macOS and Windows’ built-in share targets. On the Mac, you can use AirDrop, and on Windows, you can use My People, email, and any other Store installed apps that accept photos. The Export option replaces the tried-and-true Save for Web option (though you can still use that if you prefer). It’s faster and it delivers smaller files, especially when it comes to JPGs. You can also export and import SVG (scalable vector graphics) files, which are commonly used on websites.
You can export at multiple sizes simultaneously, convert to the sRGB color space, and export a single layer or Artboard. You can also set up a Quick Export option from the File menu to use the format of your choice. Finally, you can add metadata, such as copyright information, at export.
Beyond Mere Photoshopping
Photoshop makes it easier and easier do amazing things with digital images: Each time I investigate its features to review a new version, I discover new capabilities—even ones that have long existed—so great is the program’s depth. Integrated stock photography, advanced font tools, and organizational and syncing features, such as Cloud Documents and Libraries, are unique to the application.
Beyond photography, you won’t find photo editing software with better, more complete, or more precise tools for drawing and typography, both of which continually improve. Adobe also understands the move toward mobile and web-focused design, along with the need for 3D tools. Photoshop’s position as the preeminent image editing tool remains secure. It earns a rare five-star rating and is the PCMag Editors’ Choice winner for image editing software.


Reviews
There are no reviews yet.