

Description
Adobe’s Lightroom is unquestionably the leading professional photo-workflow software. The one question is, which Lightroom should you use? The photo software is now available as two separate applications: the consumer-targeted Lightroom and Lightroom Classic, reviewed here. Lightroom Classic offers professional photographers a powerful way to import, organize, and correct everything they shoot. The June 2021 update adds a lot of pro presets, Super Resolution upscaling, Apple Silicon M1 support, and live view for Nikon tethering. Other recent updates include local hue adjustments, a Texture slider, and the Enhance Details tool, along with interface tweaks and performance speedups. The program earns a rare five-star rating and a PCMag Editors’ Choice award.
Though there are excellent competing products such as ACDSee Pro, CyberLink’s PhotoDirector, DxO’s PhotoLab, and Phase One’s Capture One, none equal Lightroom Classic’s combination of smooth workflow interface, organizers, and adjustment tools. HDR tools and panorama-stitching tools, improved performance, face recognition, a mobile app, and cloud integrations are also at your disposal, along with top-notch lighting, color, geometry, and lens-profile based corrections.

Table of Contents
A Tale of Two Lightrooms
With the release of the rethought Lightroom, the program photo pros have come to know and love got a younger, and frankly, still fairly immature sibling. Lightroom does offer simpler, cleaner interface, but it lacks some expected tools—including the ability to print and plug-in support. Pros will want to stick with the subject of this review, Lightroom Classic, the true heir to the Lightroom throne that offers every bit of the franchise’s functionality. Lightroom, on the other hand, is more suited to consumers and enthusiasts who want everything available from the cloud—since the newer program requires you to upload all images to its cloud storage before you can edit.
Setup and Pricing Options
A Creative Cloud Photography subscription (which costs $9.99 per month) gets you not only Lightroom Classic, but also the full version of Adobe Photoshop (which alone used to cost up to $999), along with 20GB of online storage. Adobe no longer offers Lightroom as a one-time purchase, and no longer updates pre-Creative Cloud versions—if you see one for sale (the last perpetual license was for version 6), run the other way, since you’ll be paying for obsolete software that won’t support recent camera models.
To install Lightroom, you need an up-to-date OS, as it only runs on Windows 10 (Version 1903 or later), or on macOS 10.14 or later. It now runs on Apple Silicon M1-based Macs, but not on Windows 10 on ARM, though Lightroom (non-Classic) does. The Windows version requires 64-bit operating system versions.
You install and update the program through the Creative Cloud utility that sits in the Taskbar; you’ll need a fast Internet connection or lots of time for getting started, as it takes up nearly 2GB of drive space. You also have the option to download a full-featured 7-day trial (Adobe has reduced this from the previous very generous 30-day trial).
When I first ran Lightroom, a ball icon bounced over to the software nameplate, showing that clicking on it opens a three-choice dropdown menu. This is where you turn on and off face detection and address lookup for GPS coordinates. A cloud panel appears at top right, showing your remaining cloud storage amount and syncing status.

Interface, Import, and Organize
Unlike Corel AfterShot Pro and Lightroom, Lightroom uses separate modes for organizing (Library), adjusting (Develop), and other program functions. You can turn the mode entries on and off at top left (and even change their font). By default, modes now include Library, Develop, Map, Book, Slideshow, Print, and Web. A nameplate appears at top left when you sign in for syncing your photos with Lightroom Mobile and Lightroom.com.
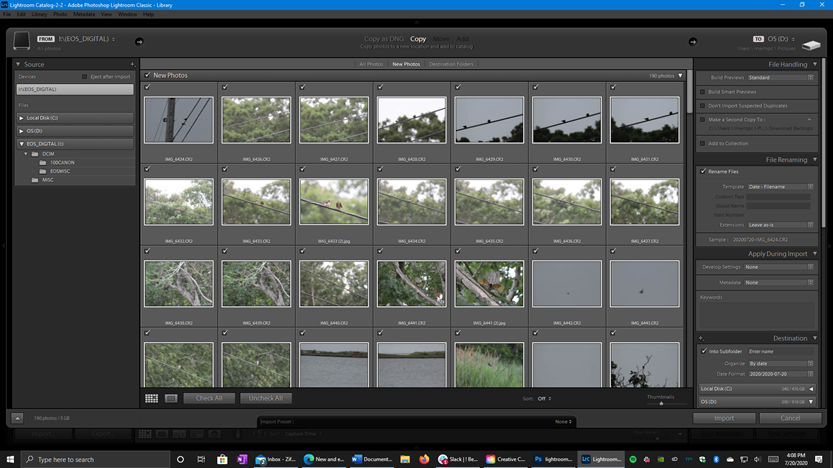
Lightroom has a big, ever-present Import button and media auto-detect that launches the nondestructive importer. This lets you see thumbnails and full-size images on memory cards even before you import them. External media is by default selected in the Files section, rather than in the Devices section, which Adobe claims is faster. Lightroom lets you start work on any photo in the set before all the import processing is done. Usually, you’ll want to import photos as camera raw files, which offer more control over the final images. Lightroom supports camera raw file conversion for every major DSLR and high-end digital camera.
Lightroom imports pictures using a database, which Adobe calls a catalog. The database approach makes sense for photographers with huge collections of large images, and you can store the database file separately from the actual image files. This is helpful if you want to store them on external media or a NAS. At import, you can either Copy, Copy as DNG (Adobe’s universal raw camera file format), Move, or Add. During import, you can have the program build Smart Previews for faster editing, ignore duplicates, add to a Collection, or apply a preset such as Auto Tone.
Lightroom Classic can now import Photoshop Elements catalogs and .PSB files. It’s nice to see Elements getting some love from the Creative Cloud club, as it has long seemed a very separate entity. PSB files are like PSDs (Photoshop Document), but the B stands for big, since these files can be up to 512 megapixels and 65,000 pixels wide. Note that you need to check the Maximum Compatibility box when saving in Photoshop for the Lightroom import to work. You can now choose which monitor is used for preview and which for controls, if you have a multiple-monitor setup.
Another way to get photos onto your computer is to tether it. Mostly of use to pro photographers, tethering lets you connect your camera with a USB or FireWire cable and actually control the shutter release from the computer. ACDSee and CyberLink PhotoDirector, by comparison, offer no tethering capability, though Capture One does. In its February 2019 update, Lightroom Classic got faster tether transfers for Nikon SLRs to catch them up with the improvements made for Canon updates, and the June 2021 update adds live view for Nikon tethering. You can control ISO, shutter speed, aperture, and white balance in the software.
In Library mode, double-clicking takes you between thumbnail and screen-fit view, and another click zooms in to 100 percent. Zooming, unfortunately, is limited to Fit, Fill, and ratios like 1:3, and 1:2, and it doesn’t make good use of the mouse wheel, as many other photo editors do. You can use a touch screen to pinch-zoom to any level you like—something I was thrilled to see in testing on my Acer T232HL touch-screen display. There’s even a touch interface with large controls, which you can enable by tapping a finger icon.
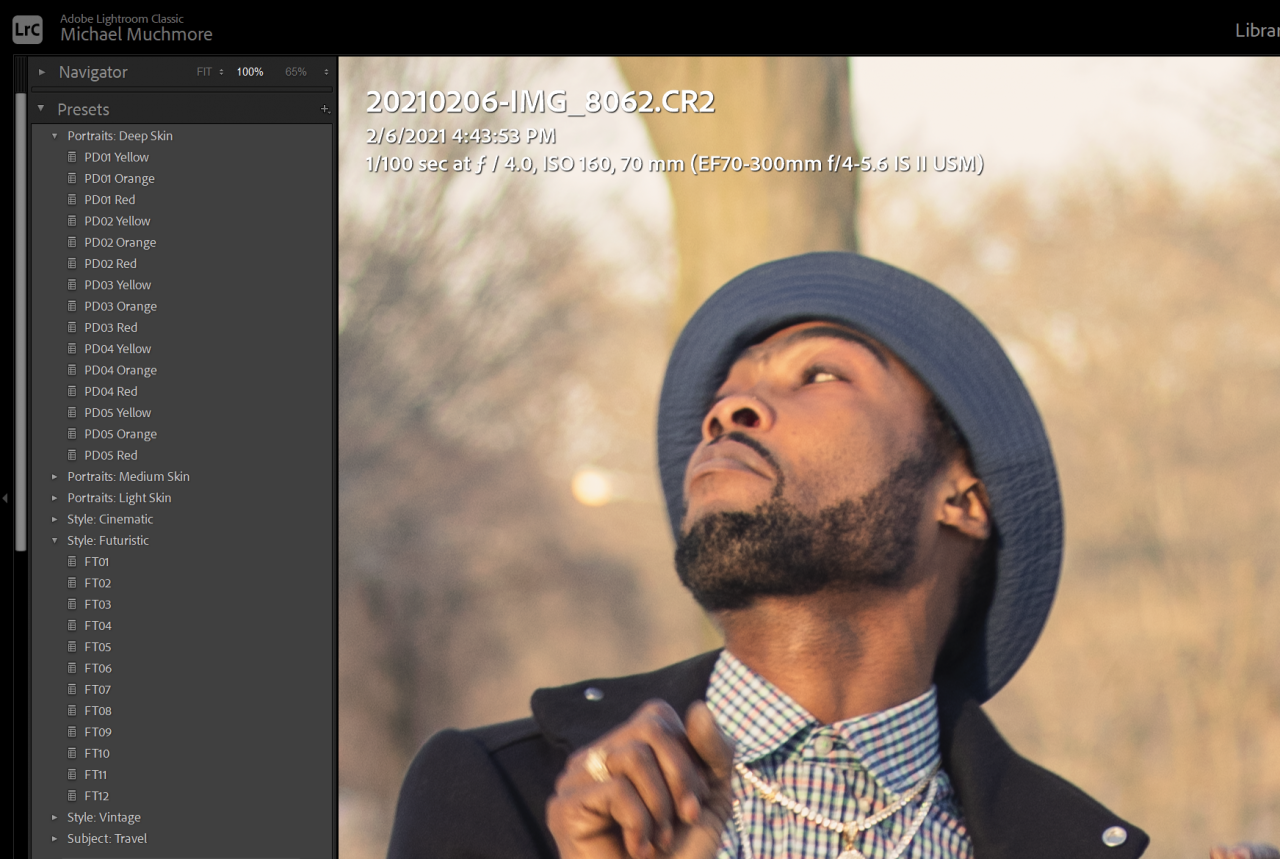
Lightroom’s Library mode offers unmatched organizational abilities, including the ability to group pictures into Quick Collections of thumbnails you select, and Smart Collections of photos that meet rating or other criteria. Star rating, flagging, and rotating can also be done from within the thumbnails. You can use Quick Develop tools in the Library mode for lighting fixes or preset effects (B&W, Cross Process, and the usual Instagram-like suspects). A lot of new presets created by professional photographers arrived in the June 2021 update, in categories including Portraits (for Deep, Medium, and Light Skin), Style (including Cinematic, Futuristic, and Travel). I’d prefer descriptive terms, however, rather than numerical designations like FT10, FT02, FT03, and so on, for the names of the Futuristic presets, for example.
One basic fix you can’t do unless you move to Develop, however, is cropping, but you can hit the R keyboard shortcut to get right to the cropper, which offers aspect ratio presets and leveling, as well.
Lightroom has long let you create custom presets, but you can now create ISO-adaptive presets. Take, for example a situation in which you have several photos shot at ISO 2000, for which you want a certain level of noise reduction; but for ISO 800 shots you want a lower level. The option lets you automatically apply the adjustment you want based on ISO. To get the feature to work, you need to select two or more photos with different ISO levels. The adjustment then applies the correction on a sliding scale, so, for example, if you apply it to a photo with ISO 1250, the setting is in between the two you set. You can even use this preset as a default for your raw camera files.
Another useful tool in Library mode lets you click on thumbnails to apply either metadata or adjustment presets. The program also does a good job of making it easy to compare images side by side. A Survey mode lets you select several images for larger comparison views, and the loupe tool magnifies spots for close work.
Face Detection
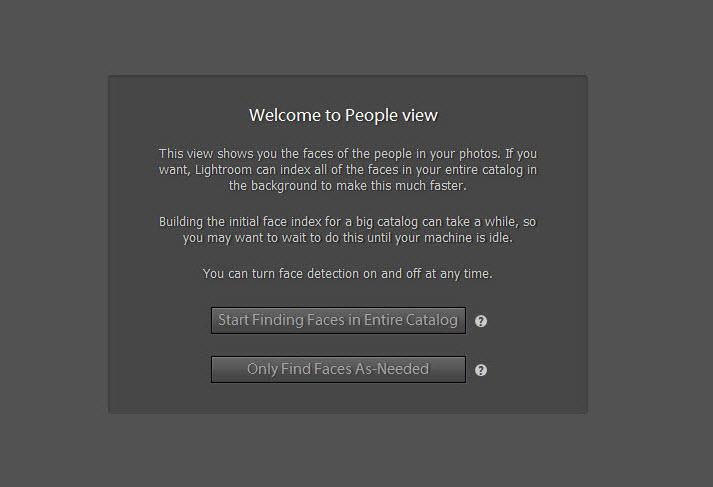
Like its enthusiast-level sibling, Photoshop Elements, Lightroom offers face detection and recognition. You can get started with the feature either by clicking on the software nameplate at top left and choosing Face Detection from the dropdown, or you can click on the face icon in the toolbar in Library mode to enter People view. That’s actually a little more hidden than I’d like: There’s no entry in the left pane with Collections and Catalog, and a Faces mode view would be nice, to go along with the Map mode.
You can start finding faces in your entire catalog or to only find faces on an as-needed basis:
To test this, I chose the first option, and the program began detecting faces right away. It built a grid of unnamed people, stacking those that it detected as being close enough to be considered one and the same person. It’s interesting how a person in the same session but with a different expression sometimes isn’t included in his or her stack.
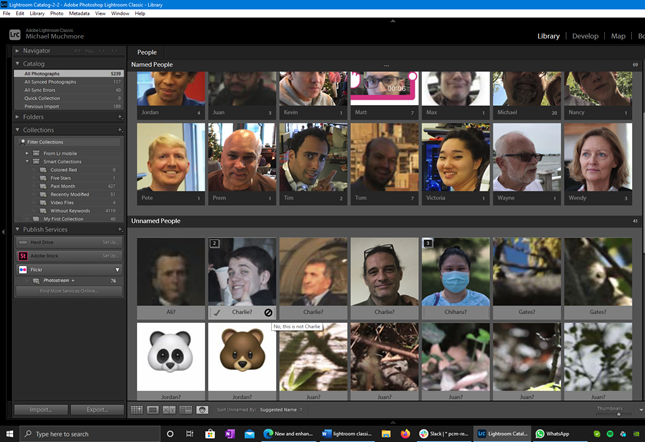
Once it’s done detecting, you type a name into the box with a question mark below the photo or stack, and it pops right up into the Named People section. Once you name a few, Lightroom proposes names for unnamed face shots. You just hit the check mark if it’s correct. It’s one of the smoothest and simplest implementations of people tagging I’ve seen. Adobe has clearly studied how other apps do this and come upon a great interface and process. This time I tested it, it claimed several nonhuman images—patterns in shrubbery—had faces. If you only have a couple named faces, it can match some wildly off other faces for the name, so a bit of training is required. It also has trouble with profiles and faces partially hidden by hats and other clothing, and as you’d expect, paintings, statues, and Memoji are also detected as faces.
Once faces are tagged, you can always get to them by tapping the same face icon in Library mode, but I wish you could also easily create smart albums based on peoples’ names or even use a People mode as you can use Map mode. Face detection might seem like a consumer feature, but pros who shoot events with lots of faces could certainly make good use of it.
Raw Profiles
Most Lightroom users probably know that working with raw camera files offers the most leeway when you’re correcting images. It lets you change the image’s white balance after the fact and enables you to bring out more detail in over and underexposed areas. Lightroom translates raw data from the camera sensor into a viewable image, using a rendering Profile.
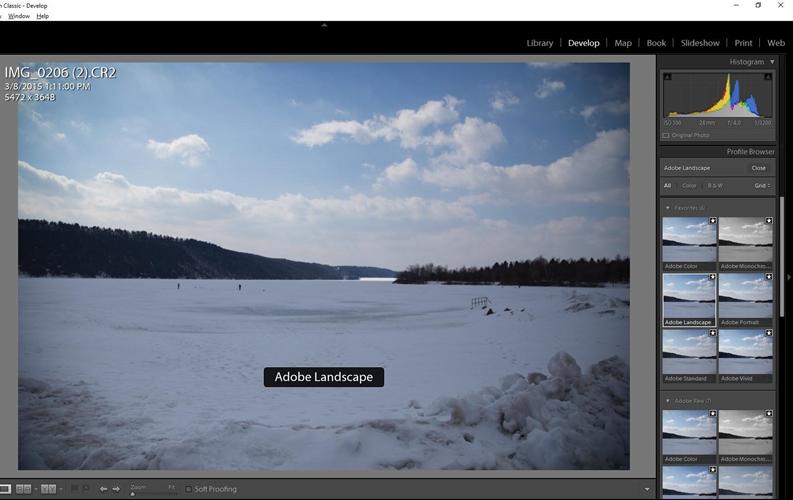
The Profile option is at the top of the Edit adjustment panel in the Basic section. These Profiles reflect Adobe’s color technology more than that of the camera maker. It’s important because it’s the starting point for any other editing you do, so it makes sense to put the option at the top. One quibble is that I wish the option had also been added to Library mode’s Quick Develop section; after all, if it’s the first thing you should do, it would make sense to have it there.
For a while, I’ve considered that Capture One has done the best job of initial raw conversion—that pictures look better right after you import them and before you make adjustments. Phase One’s software brought out more detail and color than Adobe’s blander Standard Profile. The Profiles in Lightroom bring Adobe’s program at least up to Capture One’s level.
Profiles are grouped into two basic categories: raw and creative. The first group includes Adobe Raw and Camera Matching Profiles, while Creative options include Legacy, Artistic, B&W, Modern, and Vintage. The raw Profiles only work with raw images, while the last four are special effects that also work with JPG images.
The Adobe Raw group includes Adobe Color, Monochrome, Landscape, Neutral, Portrait, Standard, and Vivid. Adobe Color is the default for newly imported photos. It gets a bit more contrast, warmth, and vividness out of the photo than Adobe Standard, which is the same as the previous version of Lightroom. You can thankfully now turn on lens-profile corrections for everything you import, rather than making you go down and turn them on for every photo after importing.
For several of my test shots, particularly of color portraits and landscapes, I now actually prefer Lightroom’s initial rendering to Capture One’s, though I prefer the less-juiced-up Portrait for many photos rather than the default Color profile, which I find oversaturated. Any photos you’ve already imported will retain the legacy Adobe Standard Profile, so you may want to go back and switch that to Adobe Color or one of the others if you’re working on an older shot.
Camera Matching Profiles are based on your camera manufacturer’s image rendering. As you might surmise, they’re designed to match what you see on your camera LCD or the JPG the camera produces. I found these less effective than Adobe’s Profiles. In test portraits shot on a Canon EOS 1Ds some were too cool, and others were oversaturated.
The Monochrome Profile is a better option than starting with a color Profile and then converting to black-and-white. That’s because it starts from the raw camera image. Portrait is supposed to reproduce all skin tones accurately, and Landscape adds a lot more vibrancy, since there are no face tones to worry about distorting. Neutral has the least contrast, useful for difficult lighting situations, and Vivid punches up saturation and contrast.
The Creative Profiles may remind many people of Instagram filters. I’m disappointed that they have names like Artistic 01, Modern 04, and so on. I’d prefer names that give you a sense of what the effect does rather than numbers. For example, Instagram users know what the Valencia filter looks like. Despite that quibble, the Creative Profiles really do add moods, usually without being overdone. In some cases, they produce a one-step improvement. The 17 B&W choices are remarkably varied, too.
The February 2020 update added some control over what raw profiles are applied by default during import. You can have a Master setting as well as camera-specific settings. Either of these settings can tell the importer to use the camera’s raw treatment or Adobe’s profiles and effects. You can even have separate settings for two cameras of the same model, distinguishing them by serial number.
Enhance Details and Super Resolution
Another relatively new tool for raw camera files is Enhance Details, which landed in both flavors of Lightroom in the February 2019 update. The feature is intended to clarify complex parts of an image. It’s a very subtle effect, and for many photos, it doesn’t do a whole lot, especially for parts of the photo that contain consistent texture, such as the sky. You access the feature from the Photo menu (or from a right-click menu), and then it shows you a dialog with a detail view of your shot. Running it creates a new DNG file. It’s a very compute-intensive operation, and even crashed my system on one occasion.
On some shots, the difference wasn’t noticeable at all, and on some, it was only noticeable at 2:1 magnification. I did see more detail in a shot of wet pavement, and it could certainly make a meaningful difference in a large print. However, it doesn’t feel close to a 30 percent improvement in detail. In the following shot, the gravel on the right side looks more gravelly:

In the shot below, the medallion shows more detail to my eyes (though not to those of some of my coworkers). Still, I’m not convinced that it has 30 percent more detail. PCMag’s camera guru, Jim Fisher tried the feature in the macOS version on his 5K iMac and found similarly minimal changes to the images.

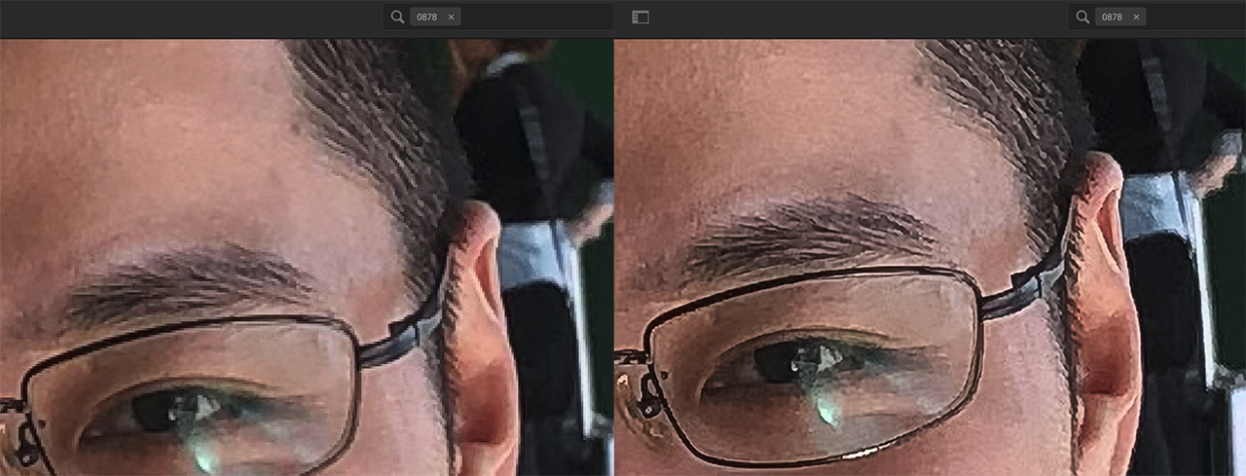
A newer related feature is Super Resolution, which you can apply to the selected photo from the Photo > Enhance menu item or by right-clicking and choosing Enhance. The tool works with JPGs rather than raw files and is intended to improve old, low-megapixel images. In my view, its AI edits give photos an artificial look, though it does smooth out pixelation.
 The left side shows the original and the right side shows Super Resolution applied.
Photo Adjustment
In the Develop mode, sliders for adjustments like Exposure, Contrast, and Blacks all sit right in the middle of their tracks at zero, letting you slide them up and down. Having everything set to a 0 baseline and slider motion up to 100 and down to -100 makes good sense. It’s possible to adjust multiple photos at once, by selecting them on the filmstrip along the bottom and tapping the Auto Sync button. You can be very specific about which adjustments you want to synchronize. The button always shows when auto-syncing is enabled. A tooltip now displays the number of images the develop settings will be applied to.
Adobe claims that the Auto Settings button, tucked next to the Tone group of controls, has been sped up, but it’s still far from instant. There’s also an Auto button in Library mode’s Quick Develop panel that does the same thing. I’m seldom thrilled with its results, though it’s effective on photos with very poor lighting. I find that it often results in overly bright, contrast-y images.
The program’s shadow and highlight recovery tools let you bring out a dark face without blowing out the bright sky in an image, for example. You can also do this with an adjustment brush, but the effect is more natural when applied with Lightroom’s Highlights and Shadows sliders. Most photo apps these days, however, include shadow adjustment, even the free Microsoft Photos and Apple Photos. A basic behavior of all the lighting sliders is that moving them to the left always darkens the image, to the right brightens. Other programs have less consistent controls.
In addition to the sliders, Lightroom offers a Photoshop-like Tone Curve adjustment tool that was updated in the latest release. You can not only drag sections of the curve up and down to brighten and darken the original values, but you can use a control directly on the photo to brighten and darken areas with the same brightness value. You can switch between parametric and point curves. The first option simply divides your image into four ranges—highlights, lights, darks, and shadows—to which the curve edits limit you. The old-school point curve option lets you specify an exact luminosity value and adjust that. Now you can even pin a control point and adjust its value numerically.
Area-specific adjustments are possible with Lightroom’s Adjustment Brush tool. These let you apply white balance, noise reduction, and moiré removal to specific areas of an image. You can also use the Hue slider with local adjustments. This can be very useful for images in which you want different hues for different parts of the photo, such as a face that looks too red.

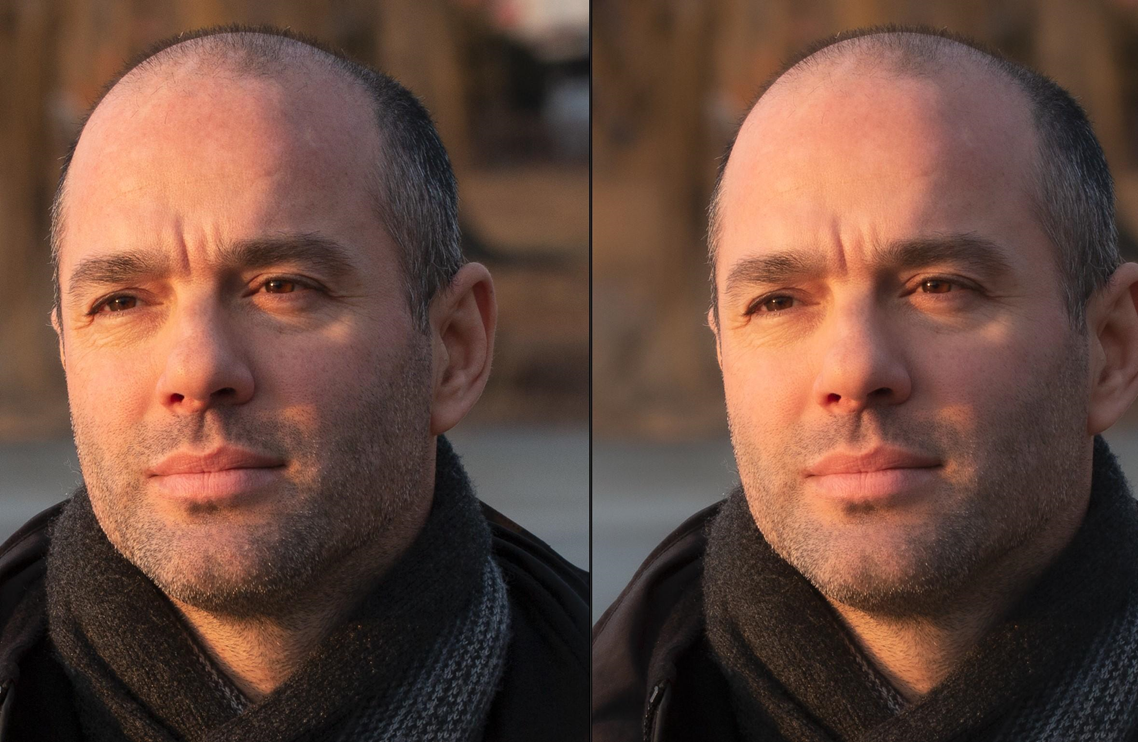
The relatively new Texture slider lets you either soften or increase details in a photo. Notice I didn’t say “sharpen,” since the Texture tool is designed to avoid the severe edges that sharpening usually adds. You can use Texture as either a global or local adjustment. You can also use it to smooth faces without giving them an artificial, doll-like look. The tool affects the medium-size details rather than the fine, tiny details that Sharpen affects. In the image below, increasing the Texture slider adds detail, but doesn’t affect noise in the sky the way Sharpen does:

Next up is the opposite case, where you want smoothing. Here, Texture is set to -38 on the right side. For me, it’s still a bit too powdery, but I like how the whiskers are preserved:
Range Mask Selection
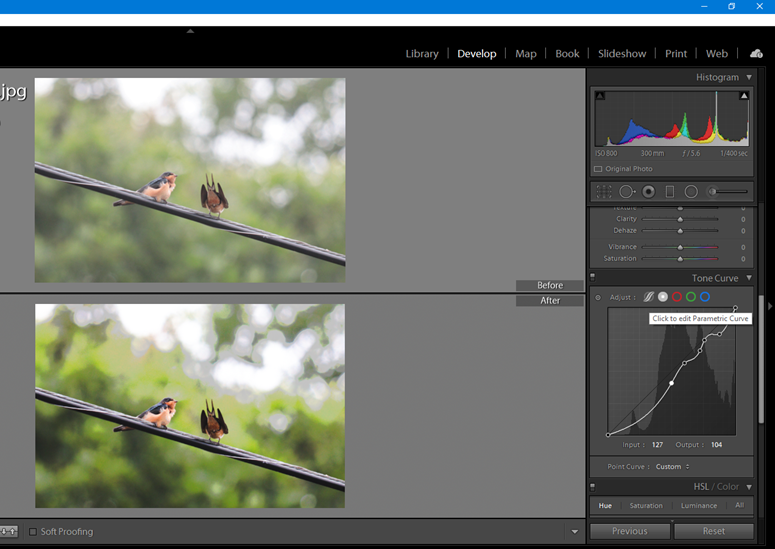
The Range Mask local adjustment selection tool can use either luminance (light value) or color to refine a selection you made with the Graduated Filter, Radial Filter, or Adjustment Brush. It extends or reduces the area you selected based on light or color. With the latter, you can use a dropper, and even a rectangle to choose the color you want selected. It’s great for cases where you have, say, a very dark group of objects and want to change the background. I used it in the photo below to brighten the bird while leaving the rest of the photo alone.

Lens Corrections
Lightroom offers profile-based lens correction for geometry, vignetting, and chromatic aberration. Lightroom’s automatic chromatic aberration correction is now equal to that in the excellent DxO PhotoLab. Lightroom also does an excellent job of removing image noise. And if you really want to supercharge your editing, Lightroom’s plug-in capability allows you to add powerful third-party tools like VSCO Film Essentials and ON1 Effects. An Adobe Exchange panel applet streamlines the process of plug-in installation.
Upright Perspective Correction
The Upright tool, which corrects geometric distortion that comes from pointing your camera up at a subject, for example, is something Lightroom shares with Photoshop. In Develop mode, under Transform, you see the Upright option, which attempts to correct perspective problems such as those you get with wide-angle lenses. In addition to Off, you have five modes of operation for this tool: Level, Auto, Vertical, Guided, and Full. The Guided option is possibly the best. I tried it out on a cityscape and an indoor shot, and the result was a definite improvement compared with the original’s off-kilter angles.
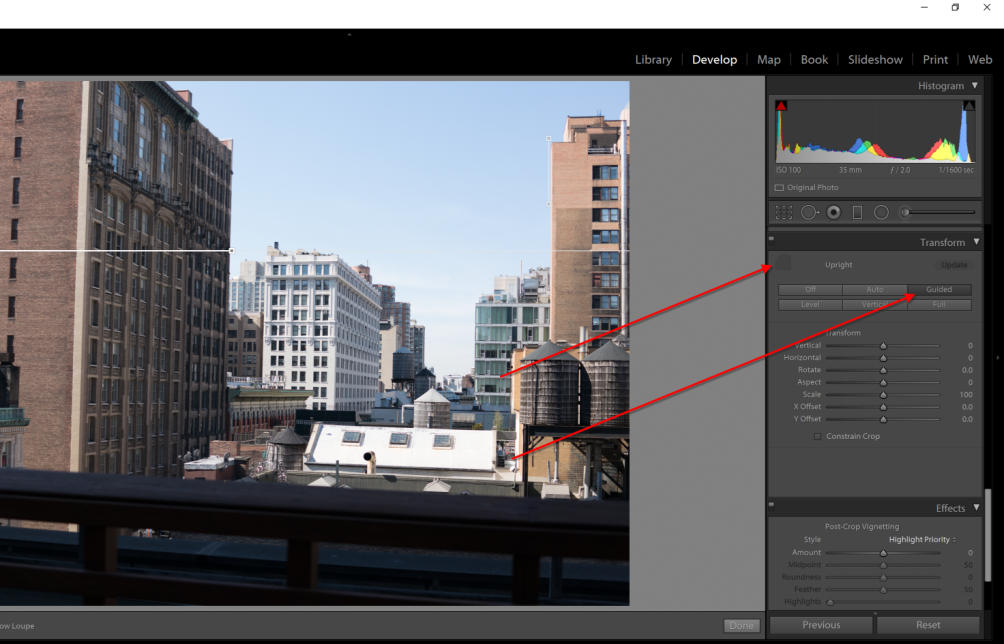
Note that when you have people in your shot, especially on the sides of a wide shot, it’s harder to get everything looking natural. The app offers control guidelines that you can draw on the image to match straight lines, such as building edges or wall joints. The correction only appears after you draw two guidelines on your photos, but you can add up to four. (Unfortunately, that wasn’t enough to correct the perspective of my Boundary Warped panorama from the previous section.) In my testing, this feature did a great job straightening out perspective without warping people’s faces.
A product aimed at nothing but this problem, DxO ViewPoint, is another option if this type of correction is important to you. Of course, Lightroom still offers manual sliders to adjust geometric distortion, but that can be dicey, especially where people are in the photo. Upright is a valuable tool, especially if you shoot geometrical structures such as signage. And it’s not something you find in most photo workflow competitors.
Healing Brush
Photoshop users will be familiar with the term Healing Brush. What this tool does is to let you actually remove an object from your photo, replacing it with a texture and color from another area in the photo. You can even select a non-circular region for the correction. This is a big help, since most objects aren’t perfectly circular, and you might want irregular shapes to retain the original image. The tool’s Visualize Spots setting displays a negative of your picture so that you can see spots you may have missed. This actually showed me some subtle spots on a wall that I’d missed in normal view.

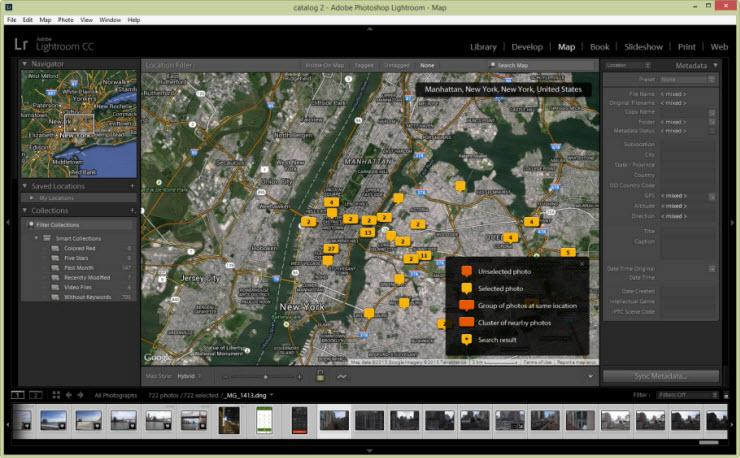
Maps
Smartphone cameras nearly all record location data for photos, as do some standalone cameras like my Canon EOS 6D DSLR. Lightroom’s Map mode can take advantage of this data, showing photos’ exact locations. Videos, however, aren’t fair game for mapping. The program sends your photos’ GPS coordinates to Google for this, so you may want to consider your privacy when using Map mode. The map shows thumbnails of the located images. Double-clicking these opens them at full size.
Books
Adobe has teamed up with self-publishing service Blurb to bring you powerful yet easy book design and printing. In the Book module, you can tinker with the page layouts, or completely automate the process with the Auto Layout option. You can choose from several preset layouts for any page, or save your previously designed layouts for future use.
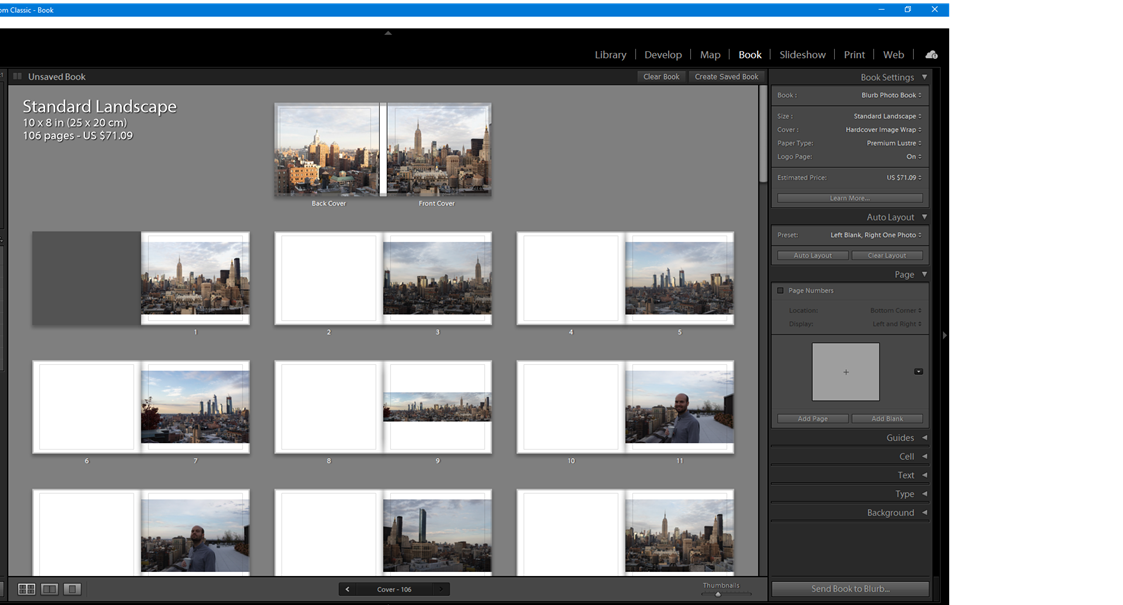
The price for your book is clearly displayed, so you know what you’re getting into from the start. The cheapest option I found was a custom magazine for $5.99. I quickly produced a beautiful book in the app in under an hour, but you could spend a lot more time to perfect the layout. One annoyance is that it places every photo in the Library page you’re on into a new book you’re creating—even if you select just a few on the Library page. Your book designs can also be exported to PDF or JPG formats. For standard photo printing, check out PCMag’s roundup of photo printing services.
Sharing Photos
Not only does Lightroom continue to support many output options for which plug-ins are available, but built-in support for Flickr and Facebook also makes uploading to those popular sources easy. Facebook and Flickr comments and likes and are visible right inside Lightroom. Very cool. You can also upload video directly to these services or share a photo via email with a right click.
One export option is to submit your images for sale on Adobe Stock. The export plug-in for this is installed by default. To start submitting your work, you need not only a Creative Cloud account, but also a Stock contributor account, which is pretty easy to set up and just requires ticking a few checkboxes.
After that, submission is a simple matter of dragging photo thumbnails to the Adobe Stock Publishing Service area in Library mode, and then describing them on the website. Adobe automatically tags recognized objects like buildings, which makes it even easier. The hardest part came right when I went to submit my first batch of photos. You have to scan an ID that proves your age. A few of my upload attempts for this were rejected. But who knows? You may finally make some money from your hobby.
Lightroom doesn’t support the desktop operating systems’ built-in share features, since it’s not a UWP app.
Mobile Apps
For Creative Cloud subscribers, Adobe offers mobile apps for iOS and Android, and they keep improving and taking more advantage of the platforms’ new capabilities. Lightroom for iPad now supports split-screen mode, and in the Lightroom for iPhone app, 3D Touch is supported, and you can shoot with live filters enabled. Its Pro mode lets you manually set focus, white, balance, and shutter speed, and ISO—pretty nifty. The key reason for the apps, though, is to be able to edit photos in sync with the desktop program. They do this admirably. For more details, see the linked reviews above.
Performance
Lightroom uses your graphics processor for photo adjustments such as exposure, distortions, radial filters, crop, and panning. The February 2020 update added acceleration for Lens Correction and Transform adjustments, and subsequent updates have added even more performance improvements, with the June 2021 update focusing on speeding up the process of selecting and updating metadata for multiple images. If you have a decently powered PC, you shouldn’t be detained too long with any Lightroom operations, which isn’t the case for the slower Corel PaintShop Pro (though that has improved recently), Skylum Luminar, and Zoner Photos Studio.
In previous reviews, I expressed a wish that Adobe would improve the app’s import speed, as importing raw photos into Lightroom was still time-consuming compared with the competition from Phase One and CyberLink.
For Classic, the company claims an improvement in import speed, and indeed, now that speed is on a par with and even a little better than the competition. For a quantifiable result, I tested import speed with 190 raw images (a total of 5GB) from a Canon 80D. My test computer was a 64-bit Windows 10 PC with 16GB RAM, a 3.4GHz quad-core Intel Core i7-6700 CPU, and an Nvidia GeForce GTX 745 discrete graphics card. I imported from a Class 4 SD card to a fast SSD on the PC. Adobe Lightroom Classic took 3:51 (minutes:seconds). By comparison, Capture One 20 took 4:55, and Zoner Photo Studio took 4:54, and Skylum Luminar headed up the rear at 5:03. Some photo apps, such as DxO PhotoLab, don’t bother with an import process at all, and simply let you work on pictures wherever they are stored; it’s up to you to organize them after editing.
Stick With a Classic
Lightroom Classic, already at the top of the class, has only gotten better with the addition of raw import Profiles. Its top-notch organization features; lens-profile-based corrections; noise and chromatic aberration adjustments; Healing Brush; and other tools make it indispensable for the professional photographer. Lightroom earns its reputation as a well-loved program that’s long been the choice of pro and prosumer photographers, despite the company’s imposition of a subscription fee and now forking the product into two separate apps. Adobe Lightroom Classic earns PCMag Editors’ Choice award for photo workflow software, and a rare five-star rating. If you’re more into photo projects without the deep tech, check out fellow Editors’ Choice Photoshop Elements, and for those wanting the ultimate in noise reduction, there’s DxO PhotoLab.


Reviews
There are no reviews yet.